Checkpoints
Build a Cloud SQL instance with API Explorer
/ 20
Create a database in your Cloud SQL instance
/ 20
Create a Cloud Storage bucket
/ 20
Upload the CSV file to your Cloud Storage bucket
/ 20
Add Storage Admin role to Cloud SQL service account
/ 20
APIs Explorer: Cloud SQL
- GSP423
- Overview
- Setup and requirements
- Task 1. Build a Cloud SQL instance with instances.insert
- Task 2. Create a database with databases.insert
- Task 3. Create a table in your MySQL database and upload a CSV file to a Cloud Storage bucket
- Task 4. Add a CSV file to your database using instances.import
- Task 5. Inspect your updated database
- Task 6. Delete your database
- Task 7. Test your understanding
- Congratulations!
GSP423

Overview
The Google APIs Explorer is a tool that helps you explore various Google APIs interactively. With the APIs Explorer, you can:
- Browse quickly through available APIs and versions.
- See methods available for each API and what parameters they support along with inline documentation.
- Execute requests for any method and see responses in real time.
- Make authenticated and authorized API calls.
- Search across all services, methods, and your recent requests to quickly find what you are looking for.
Cloud SQL is a fully-managed database service that makes it easy to set up, maintain, manage, and administer your relational PostgreSQL and MySQL databases in the cloud. Cloud SQL offers high performance, scalability, and convenience. Hosted on Google Cloud, Cloud SQL provides a database infrastructure for applications running anywhere.
In this lab, you will build a Cloud SQL instance and attach a MySQL database to it. After creating a sample CSV file and uploading it to Cloud Storage, you will create a table and pull the file’s contents into your MySQL database. Finally, you will remove the database and its associated data. You will accomplish these tasks with the Cloud SQL Admin API, where you will call various methods through the APIs Explorer tool.
Objectives
In this lab, you will use the APIs Explorer tool to:
- Build a Cloud SQL instance.
- Configure a MySQL SQL database and attach it to a Cloud SQL instance.
- Pull CSV data from a Cloud Storage bucket and upload it to a MySQL database table.
- Delete a MySQL database.
Prerequisites
This is a fundamental level lab. You should be familiar with the basic functioning and architecture of APIs. Experience with Google Cloud Shell and command line interface tools is recommended.
Familiarity with the APIs Explorer tool is also recommended. At a minimum, take the following labs before attempting this one:
If you are unfamiliar with Cloud SQL, the labs Cloud SQL for MySQL: Qwik Start and Introduction to SQL for BigQuery and Cloud SQL have valuable information that will orient you with the content of this lab. Once you're ready, scroll down and follow the steps below to get your lab environment set up.
Setup and requirements
Before you click the Start Lab button
Read these instructions. Labs are timed and you cannot pause them. The timer, which starts when you click Start Lab, shows how long Google Cloud resources will be made available to you.
This hands-on lab lets you do the lab activities yourself in a real cloud environment, not in a simulation or demo environment. It does so by giving you new, temporary credentials that you use to sign in and access Google Cloud for the duration of the lab.
To complete this lab, you need:
- Access to a standard internet browser (Chrome browser recommended).
- Time to complete the lab---remember, once you start, you cannot pause a lab.
How to start your lab and sign in to the Google Cloud console
-
Click the Start Lab button. If you need to pay for the lab, a pop-up opens for you to select your payment method. On the left is the Lab Details panel with the following:
- The Open Google Cloud console button
- Time remaining
- The temporary credentials that you must use for this lab
- Other information, if needed, to step through this lab
-
Click Open Google Cloud console (or right-click and select Open Link in Incognito Window if you are running the Chrome browser).
The lab spins up resources, and then opens another tab that shows the Sign in page.
Tip: Arrange the tabs in separate windows, side-by-side.
Note: If you see the Choose an account dialog, click Use Another Account. -
If necessary, copy the Username below and paste it into the Sign in dialog.
{{{user_0.username | "Username"}}} You can also find the Username in the Lab Details panel.
-
Click Next.
-
Copy the Password below and paste it into the Welcome dialog.
{{{user_0.password | "Password"}}} You can also find the Password in the Lab Details panel.
-
Click Next.
Important: You must use the credentials the lab provides you. Do not use your Google Cloud account credentials. Note: Using your own Google Cloud account for this lab may incur extra charges. -
Click through the subsequent pages:
- Accept the terms and conditions.
- Do not add recovery options or two-factor authentication (because this is a temporary account).
- Do not sign up for free trials.
After a few moments, the Google Cloud console opens in this tab.

Task 1. Build a Cloud SQL instance with instances.insert
You will now build a Cloud SQL instance with one of the methods found in the APIs Explorer.
-
To access the Cloud SQL APIs Explorer tool, open up the navigation menu and select APIs & Services > Library.
-
In the search bar type Cloud SQL and select the Cloud SQL Admin API from the results list.
-
Make sure that API is enabled, if not click Enable.
-
Now that you have verified the API's enablement, open the Cloud SQL Admin API reference page.
-
Under the Reference tab, navigate to All APIs and reference > REST Reference > v1beta4 > instances > insert, to select sql.instances.insert method or, to create an SQL instance resource, use the Method: instances.insert reference page.
You'll now fill out a form to use the sql.instances.insert method.
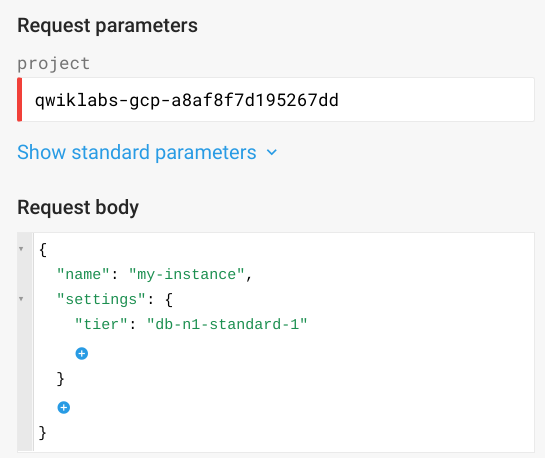
The Request body contains the resource properties that you want to use for creating your MySql instance:
-
Set the project: = your Qwiklabs Project ID.
-
Then click the blue plus sign icon inside of the curly braces in the Request body field. You'll be asked to select a property - choose "name".
-
Next to it give name as my-instance
- "name": "my-instance"
This will generate the next level.
-
Click inside the brackets and click the blue plus sign icon, select - "settings".
-
Inside "Settings" click inside the curly brace, click the blue plus icon and select "tier"; next to it type "db-n1-standard-1"
- settings:
- tier: db-n1-standard-1
Your method should resemble the following:
- Make sure that Google OAuth 2.0 checkbox is selected under Credentials section.
-
Make sure that there are no trailing spaces in any of the fields.
-
Now scroll down and click the Execute button.
-
When prompted to select an account, click on your Qwiklabs Google account.
-
On the next screen, click Allow to give APIs Explorer access.
You can see the Request that was sent to your project as code, built from the input you provided in the form.
Your response should resemble the following:
You have successfully created a MySQL instance for a Google Cloud project. Now view it in the Cloud Console.
View your Cloud SQL instance
-
Return to the Cloud Console for this step.
-
From the Navigation menu, select SQL, which is located under the Databases header. This will bring you to the instances page, where you will see your MySQL instance being created.
It will take a few minutes for your instance to be created. You will know that your instance has been created when my-instance resembles the following:
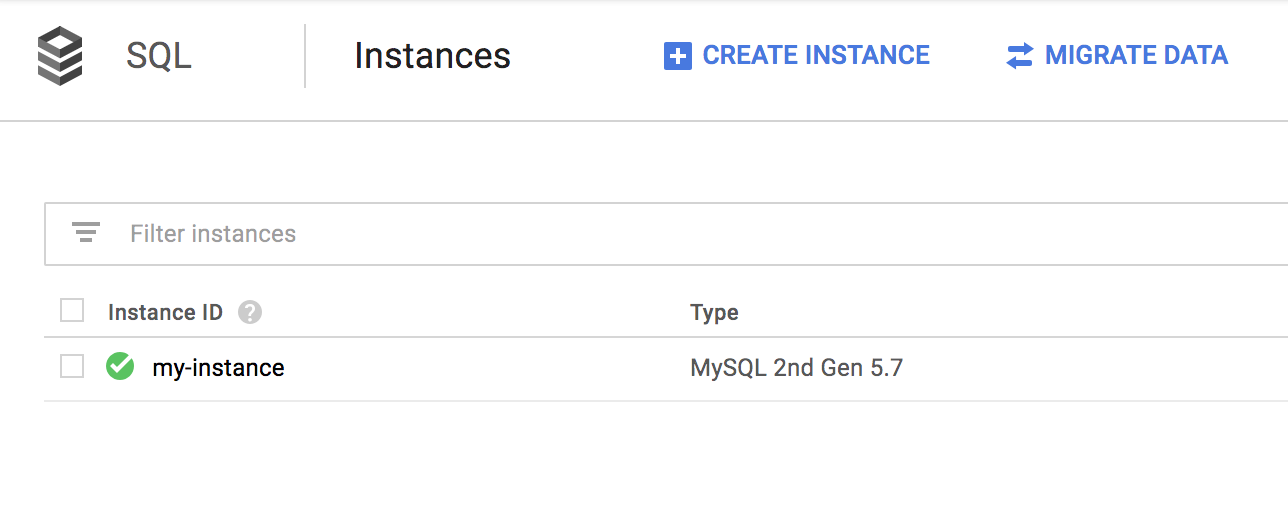
You may have to refresh your page from time to time to see changes.
- Return to the APIs Explorer page once your instance has been created and you're ready for the next step.
Test completed task
Click Check my progress to verify your performed task. If you have completed the task successfully you will be granted an assessment score.
Task 2. Create a database with databases.insert
Now that you have a Cloud SQL instance created, add a database to it with the databases.insert method.
- Under the Reference tab, navigate to All APIs and reference > REST Reference > v1beta4 > databases > insert to select sql.databases.insert method or, to create database, use the Method: databases.insert reference page.
You'll now fill out a form to use the sql.databases.insert method.
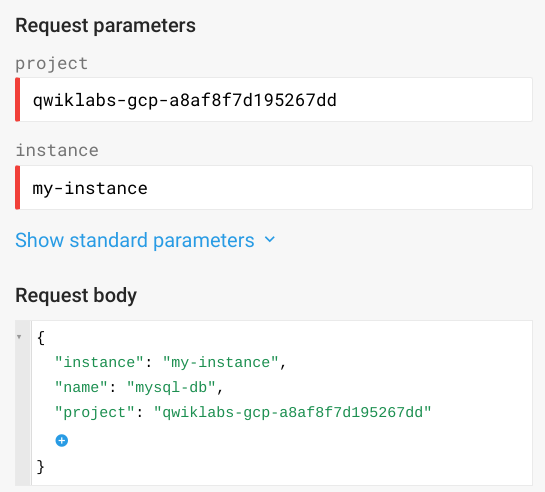
- The Request body contains the resource properties that you want to use for creating the database:
-
project: = your Lab Project ID
-
instance: = my-instance.
- Then in the Request body:
Request body = Click inside the brackets to select the following properties:
- instance: my-instance
- name: mysql-db
- project: your Qwiklabs Project ID.
Your method should resemble the following:
Make sure that Google OAuth 2.0 checkbox is selected under Credentials section.
-
Make sure that there are no trailing spaces in any of the fields.
-
Now scroll down and click the Execute button.
-
When prompted to select an account, click on your Qwiklabs Google account.
You can see the Request that was sent to your project as code, built from the input you provided in the form.
Your response should resemble the following:
You have successfully created a database inside your Cloud SQL instance. You are now ready to add some data to your database. Before doing so, view your database in the Cloud Console.
View your new database
-
Return to the Cloud Console for this step.
-
From the Navigation menu select SQL, which is located under the Databases header. This will bring you to the instances page.
-
Click on my-instance.
-
Then select the databases tab.
You will see a list of databases, with your mysql-db added:
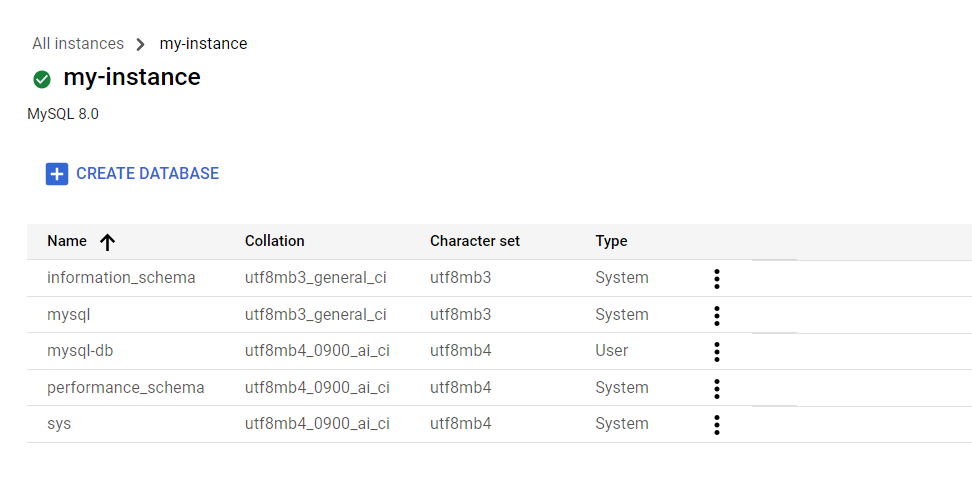
The ordering of databases in the above screenshot may be different from what you see in your Console. Make sure you see mysql-db in the list.
Test completed task
Click Check my progress to verify your performed task. If you have completed the task successfully you you will be granted an assessment score score.
Task 3. Create a table in your MySQL database and upload a CSV file to a Cloud Storage bucket
Now you will create a table in your MySQL database and a "comma separated values" (CSV) file, which will be uploaded to Cloud Storage.
-
From the Cloud Console, open up a new Cloud Shell session.
-
Run the following command to connect to your MySQL instance:
It may take a minute or two to connect to your instance.
- Enter through the password prompt since you didn't set one. You should now be logged into your instance:
- Run the following command to switch over to your
mysql-dbdatabase:
You will now create a table in mysql-db so you can import data into a specific location.
- Run the following command to create a table called
info:
You should receive a similar output:
You have successfully created an empty table in your MySQL database.
Do not exit out of this Cloud Shell session.
- Open a new tab in Cloud Shell by clicking the + tab in the top ribbon.
You will now create a CSV file and upload it to a Cloud Storage bucket.
- Run the following command to create a file named
employee_info.csv:
- Now run the following command to edit
employee_info.csv:
- Copy and paste the following into the file:
-
Hold CTRL+X → Y → ENTER to save the file. You now have a simple CSV file that's ready to be uploaded to Cloud Storage.
-
Run the following command to create a new Cloud Storage bucket, replacing
<YOUR_BUCKET_NAME>with a unique bucket name that follows the Cloud Storage naming guidelines:
Test completed task
Click Check my progress to verify your performed task. If you have completed the task successfully you you will be granted an assessment score score.
- Run the the following command to upload the CSV file to your Cloud Storage bucket, replacing
<YOUR_BUCKET_NAME>with the name of your bucket:
Test completed task
Click Check my progress to verify your performed task. If you have completed the task successfully you you will be granted an assessment score score.
To upload this file to your MySQL database, update specific permissions with your Cloud SQL service account.
-
From the navigation menu, select SQL and then click on my-instance.
-
From the overview page, scroll down and find the "Service account" card and copy the service account name.
-
Now open the navigation menu and select Storage > Cloud Storage > Buckets.
-
Click on the three-dotted menu on the far right side of the bucket and click Edit access.
-
For the principal field, Click + Add principal.
-
Now paste the Cloud SQL service account name you copied earlier in the New principals.
-
Click the roles drop down and select Cloud Storage > Storage Admin.
Your permissions sidebar should resemble the following:
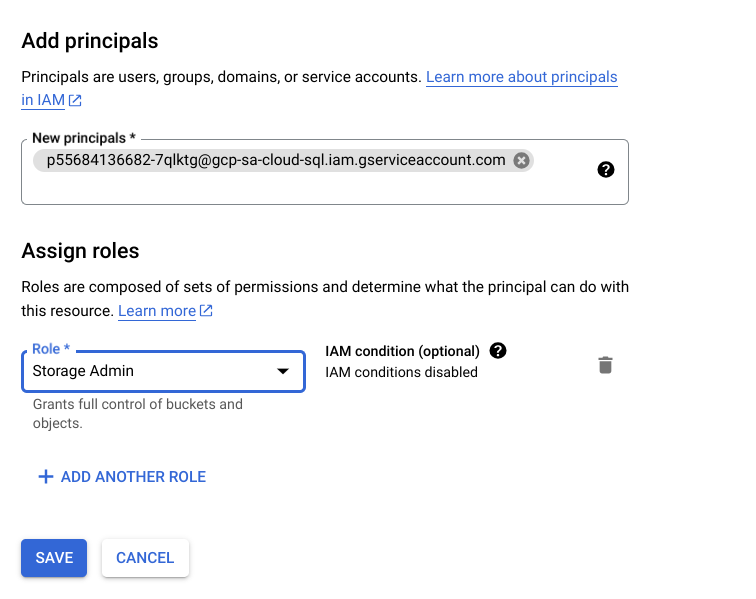
- Click SAVE. Your Cloud Storage bucket can now accept API requests from your Cloud SQL instance.
You will now copy the CSV file into your Cloud SQL database.
Test Completed Task
Click Check my progress to verify your performed task. If you have completed the task successfully you you will be granted an assessment score score.
Task 4. Add a CSV file to your database using instances.import
-
Under Reference tab, navigate to All APIs and reference > REST Reference > v1beta4 > instances > import to select sql.instances.import method or, to import data into database, use the Method: instances.import reference page.
-
You'll now fill out a form to use the sql.instances.import method. The Request body contains the resource properties that you want to use for importing the data:
-
project: = your Qwiklabs Project ID
-
instance: = my-instance
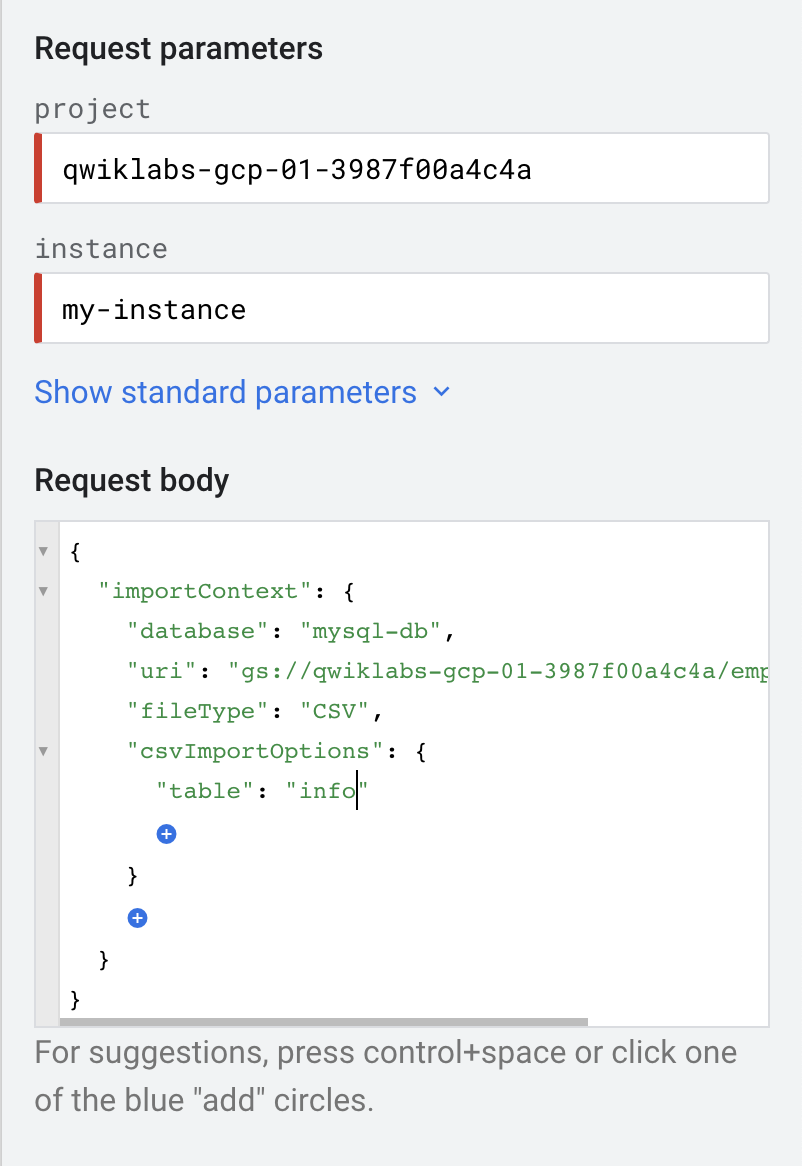
- Request body = Click inside the brackets to select the following properties:
- importContext:
- database: mysql-db
- uri: gs://
<YOUR_BUCKET_NAME>/employee_info.csv, replacing<YOUR_BUCKET_NAME>with the name of your bucket - fileType: CSV
- csvImportOptions:
- table: info
Your method should now resemble the following:
- Make sure that Google OAuth 2.0 checkbox is selected under Credentials section.
-
Make sure that there are no trailing spaces in any of the fields.
-
Now scroll down and click the Execute button.
-
When prompted to select an account, click on your Qwiklabs Google account.
You can see the Request that was sent to your project as code, built from the input you provided in the form.
Your response should resemble the following:
You have successfully added a CSV file to your MySQL database table using the APIs Explorer. You will now inspect this table.
Task 5. Inspect your updated database
-
Return to the Cloud Console and return to your MySQL Cloud Shell tab that you left open. You will now see if the
infotable picked up the CSV file data. -
Run the following command to view what's in the table:
You should receive a similar output:
With one API call in the Explorer tool, you were able to copy a CSV file located in Cloud Storage and merge it with a table in your MySQL database. This illustrates the power and efficiency of API method calls opposed to the multiple steps it would take in the Cloud Console.
Task 6. Delete your database
You will now delete the MySQL database that hosts the employee information.
-
Under the Reference tab, navigate to All APIs and reference > REST Reference > v1beta4 > databases > delete to select sql.databases.delete method or, to delete the database, use the Method: databases.delete reference page.
-
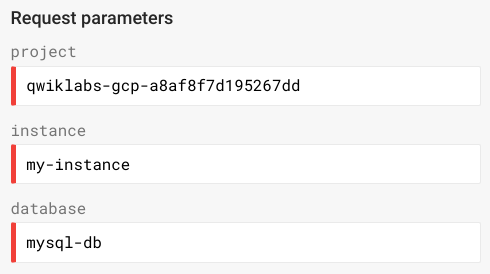
You'll now fill out a form to use the sql.databases.delete method:
-
project: = your Qwiklabs Project ID
-
instance: = my-instance
-
database: = mysql-db
Your method should resemble the following:
- Make sure that the Google OAuth 2.0 checkbox is selected under the Credentials section.
-
Make sure that there are no trailing spaces in any of the fields.
-
Now scroll down and click the Execute button.
-
When prompted to select an account, click on your Qwiklabs Google account.
You can see the Request that was sent to your project as code, built from the input you provided in the form.
Your response should resemble the following:
You have successfully deleted a database inside your Cloud SQL instance. Return to the Cloud Console for the following step.
View your updated Cloud SQL instance
-
From the Cloud Console, from the Navigation menu select SQL, which is located under the Databases header. This will bring you to the instances page.
-
Click on my-instance, then click on the databases tab. You will see a list of databases with
mysql-dbremoved.
This concludes the hands-on practice in this lab. You can end your lab here or with the remaining time explore other Cloud SQL Admin API methods in the APIs Explorer.
Task 7. Test your understanding
Below are multiple choice questions to reinforce your understanding of this lab's concepts. Answer them to the best of your abilities.
Congratulations!
In this lab, you got hands-on practice with Cloud SQL Admin API methods using the APIs Explorer. After building a Cloud SQL instance, you configured and attached a MySQL database. You then created a simple CSV file and uploaded it to Cloud Storage, which was pushed to a MySQL database. Finally, you learned how to delete a database in a Cloud SQL instance. You are now ready to take more Exploring APIs labs.
Finish your quest
This self-paced lab is part of the Exploring APIs quest. A quest is a series of related labs that form a learning path. Completing this quest earns you a badge to recognize your achievement. You can make your badge or badges public and link to them in your online resume or social media account. Refer to the Google Cloud Skills Boost catalog for all available quests.
Next steps / Learn more
Be sure to check out the following labs for more practice with the APIs Explorer:
Google Cloud training and certification
...helps you make the most of Google Cloud technologies. Our classes include technical skills and best practices to help you get up to speed quickly and continue your learning journey. We offer fundamental to advanced level training, with on-demand, live, and virtual options to suit your busy schedule. Certifications help you validate and prove your skill and expertise in Google Cloud technologies.
Manual Last Updated October 13, 2023
Lab Last Tested October 13, 2023
Copyright 2024 Google LLC All rights reserved. Google and the Google logo are trademarks of Google LLC. All other company and product names may be trademarks of the respective companies with which they are associated.